Here are the steps to setup the bitdefender rescue environment using the rescue CD.
Bitdefender Rescue CD is a free tool that scans and cleans your computer whenever you suspect a malware threat is affecting its operation. Bitdefender Rescue CD works without loading the operating system and can be set up either on a CD/DVD or on a USB flash drive.
Creating a Bitdefender Rescue CD on a CD/DVD
To create a Bitdefender Rescue CD on a CD/DVD you need the ISO image which care be downloaded from here and an image burning application. In the example below we used InfraRecorder, a free tool compatible with Windows 7 or earlier; the application can be downloaded from here.
For Windows 8/Windows 10, you can use Windows Disc Image Burner:
• Right click on the ISO file and you will see Burn Disc Image Option.
• Clicking this option will open the Windows Disc Image Burner
• Select the drive on which you want to burn the image and click Burn.
To burn an image with InfraRecorder:
• Insert a blank CD into the CD/DVD drive.
• Open InfraRecorder and choose Write Image. A browser window will appear.
• Go to the location where you have saved the ISO file.
• Select the file and click Open. A configuration window will display the recommended settings for the current task.
• Click OK. The CD is ejected after the writing process finishes.
• Go to the infected computer and boot it with the CD you have just created.
Creating a Bitdefender Rescue CD on a USB flash drive
When you cannot write a CD/DVD, you can use a USB flash drive. Bitdefender recommends Stickifier, a free open-source tool that creates a bootable Rescue CD on a USB flash.
Download Stickifier using the convenient link:
• Stickifier executable (no installation required)
To save Bitdefender Rescue CD on a USB drive with Stickifier:
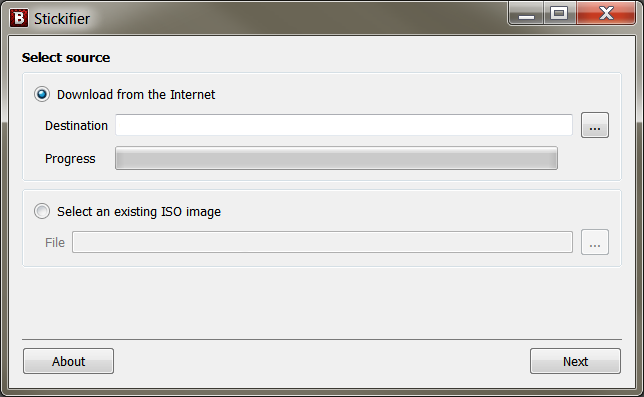
1. Open Stickifier and a wizard will take you through the necessary steps. First you need to select the image source location from the available options:
• Download from the Internet– Save the image to your computer directly from Stickifier. Use the ![]() Browse button to indicate the destination folder.
Browse button to indicate the destination folder.
• Select an existing ISO image, which you previously downloaded from the Bitdefender download page. Use the ![]() Browse button to indicate the source folder.
Browse button to indicate the source folder.
2. Click Next. In the new window, you need to provide the target removable drive for the Bitdefender Rescue CD files.
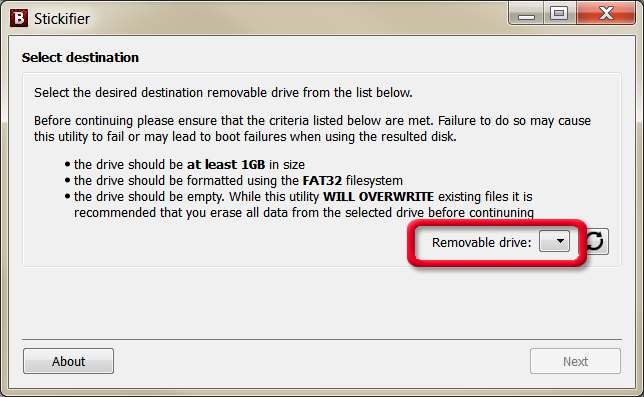
3. Mount the flash drive into the USB port and select the drive letter from the dropdown list.
NOTE: Before plugging in the flash drive, make sure it meets the requirements mentioned in the current window.
If the letter does not appear in the list, click the ![]() Refresh button.
Refresh button.
4. Click Next. The installation process starts and the progress bars show the status of your installation.
5. When the installation is complete, click Finish. The flash drive is now ready to be used on the infected computer.
NOTE: The Bitdefender Rescue CD tool requires an Internet connection to be automatically updated each time you use it. For details on how to use the Bitdefender Rescue CD, refer to this KB article.
